


Graphical Watermarks Tutorial
1 – Using The Freeform Pen tool
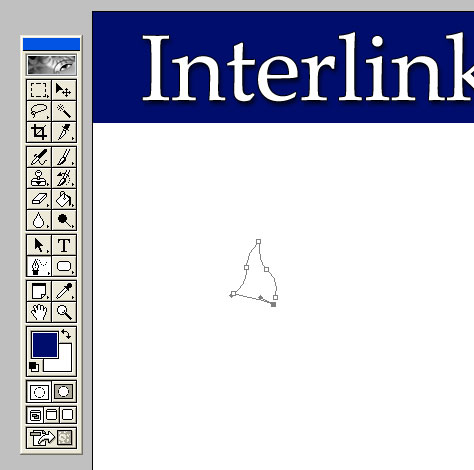
I've started here, with a blank white page (I always use width 780, height 600). The basic elements I've put in so far are the navy blue bar at the top, and some shadowed, stroked text.
 Hold down your cursor on the Pen tool, and select Freeform Pen.
(Make sure you have the
"Paths" option at the top left of the screen
selected.) I usually start by making a short line, and then
distorting it and adding points, but you can try to draw the whole shape at once, if you like.
Hold down your cursor on the Pen tool, and select Freeform Pen.
(Make sure you have the
"Paths" option at the top left of the screen
selected.) I usually start by making a short line, and then
distorting it and adding points, but you can try to draw the whole shape at once, if you like.
-
To add a point, click on an existing line.
-
To delete a point, click that point.
-
To select a point, Ctrl + click
-
To move a point, Ctrl + drag
-
To warp the lines around a point, Ctrl + click one of the two "handles" of the point.
Basically, if you're manipulating a point, always hold Ctrl.
Once you've made the shape, right-click it with the Freeform Pen Tool, and click "Make Selection". (It will connect your first and last point, so always make your shape almost a complete loop).

2 – Creating all the pieces
 Once you've made your selection, fill it with black, and duplicate it (by using Alt + the Move tool) until you have
12 of them.
Once you've made your selection, fill it with black, and duplicate it (by using Alt + the Move tool) until you have
12 of them.
 Select a
circular area.
Select a
circular area.
Fill the area with black.

3 – Making a sun shape
 Move one "spike" to the 12 o'clock position of the circle.
Put in the 3, 6, and 9 o'clock spikes next.
When rotating the spikes, press Ctrl+T for Free Transform, then, while you're rotating them, hold Shift. This makes them lock to the nearest one of 24 positions. (You'll notice that every spike should be two positions further rotated than the last.)
Oops, I made one too many spikes. *Delete* :)
Choose the Move Tool and nudge the spikes around with the arrow keys
and if any white is showing through.
Voila, a sun.
Merge all those spike layers and the circle together (click on the top one one in the Layers list, and press Ctrl+E until it's all one layer.)

4 – Creating the Overlays
Press Ctrl + I to invert the sun layer, which makes it white.
On the Layer list, move it above the blue bar layer, but under the text.
Make a few copies (Alt + Move tool), and position them.
On the Layers window, click on "Normal" and change it to "Overlay", and set the Opacity to 50%. Do this for each sun.

5 – Adding texture
For some extra effect, I've added a texture.
Choose the blue layer (not the suns) and
Photoshop 5: Go to the Filters menu, and select "Texturizer".
Photoshop 6.0 or 7.0: Double-click the layer, and give it a Pattern Overlay (Change the mode to Overlay, and set opacity to around 35%.)
Done!
<< Return to Photoshop Tutorials
