


Make Web Buttons in Adobe Photoshop – Page 1 of 2

1 – Creating the button shape
 In a new layer, select a circular area with the selection tool. (Holding down Shift will make the selection stay circular, rather than being elliptical.)
 Fill the area with the paint bucket. This is the curved end of your web button.
2 – Selecting a column for extension
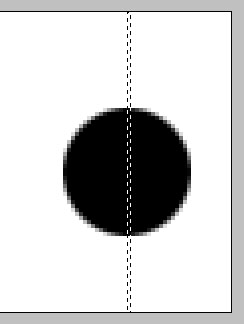
 Zoom in (Ctrl +) and select a one-pixel wide area in the centre of the circle. You can use the normal Selection Tool to do this, or you can hold down on the Selection Tool, and choose the Single Column Marquee Tool.

3 – Extending the button shape
With your one-pixel sliver of the web button selected, press Ctrl+T to "Free Transform" the selection. Extend the selection to the left as far as possible.

4 – Colouring Your web button
Press Ctrl+U to bring up the Hue/Saturation properties of the layer. Click "Colorize". Drag the sliders around until your web button has a nice colour.

5 – Giving the button some Effects
In the layers list, double-click this layer. Give your web button a Drop Shadow and a Bevel.
