


Making a Circuit Board Website Layout in Photoshop – Page 2 of 4
This page of the tutorial covers the creation of an integrated circuit.

3 – Creating the pin of an integrated circuit
 Create a new layer.
 Select a rectangular area, then hold shift and select another squarish area below it, to make a "T" shape.
 Choose the Gradient Tool. Click the small representation of the gradient (at the top left of the screen), and add some tabs along the bottom of the gradient. At 0%, put a tab (colour #D9D9D9). At 33%, put a tab (colour #E4E4E4.) At 70%, put a tab (colour #626262.) At 100%, put a tab (colour #E4E4E4.) Drag this gradient from the top to the bottom of your selected area. (You can hold Shift, to make it perfectly vertical.)
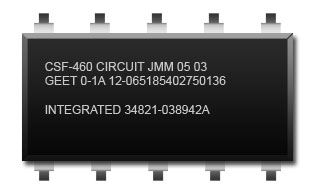
4 – Creating an integrated circuit in Photoshop
Create a new layer.
Select a rectangular area as shown.
 Use the Paint Bucket to fill the area with black.
Right-click this layer in the Layers window, and click Blending Options. Select the following:
- Drop Shadow
- Bevel and Emboss (Technique: Chisel Hard. Gloss Contour: Sawtooth.)
- Gradient Overlay (Opacity: 55%.)
 Use the Type Tool to add some white text. (This can just be gibberish. It won't really be readable once we've shrunk this component down.)
 Create a new layer set, and drag your black area, your text, and your "T"-shaped pin (that you made in Step 3) into it. This will just help to keep things organised.
Click on the pin's layer, in the Layers window.
Press Ctrl+T to transform the pin. Hold Shift, and drag the corner in, until the pin is the right size. (See image.)
 Click on the pin's layer, in the Layers window. Hold Alt while you drag it around. This will make more copies of the pin. (I've made a total of five copies of the pin.)
Click Edit > Transform > Rotate 180°.
Make more copies of the upside down pin, by holding Alt while dragging with the Move Tool. Then drag all the pins into place, around the black rectangular area, as shown in the diagram. You'll want to snap to the grid (see Step 1) to do this.
