


Make Web Buttons in Adobe Photoshop – Page 2 of 2
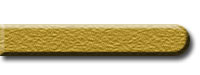
6 – Texturising the button
Click Filter, Texture, Texturizer. Choose Sandstone. I use this texture for most web buttons I do these days.
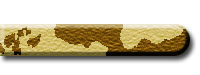
7 – Adding random colour variation
 Create a new layer.
Click Filter > Render > Clouds (If your background isn't white, you'll first need to select the area of the button, by holding Ctrl and clicking on the button's layer in the layers list. This keeps the clouds inside that area.) Click Image > Adjustments > Brightness/Contrast. Set the contrast to maximum. (This turns the random grey clouds into equally random patches of black and white.)
Change the new layer from Normal to Overlay. (This changes the layer from solid colour to a kind of illumination, as if it were cellophane over the web button layer, instead of coloured paper.)
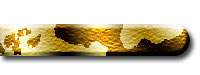
8 – Adding light to the button
Make another new layer.
 Choose the Gradient tool. Click on the visual representation of the gradient.
On the visual representation of the gradient, put in several tabs. These tabs should be in a black, white, black, white pattern.
Apply the gradient to your image, and change the layer's Mode from Normal to Overlay. This should give the button some nice illumination.

9 – Adding text to the button
 Using the Text tool, add some text to your button. Some useful tips for button text are:
- Make the button text all capitals.
- Increase the tracking (letter spacing). It makes the text more dramatic.
- Make the first letter of each word two points larger.
- Make the first letter of each word red (pale yellow for white text.)
- Use Palatino Linotype font in place of Times New Roman.

10 – Embellishing the button text
Double-click the text layer. Give it a Bevel and a white Outer Glow. I've also put a black outline on the button layer, to make it stand out more, but that's optional.
<< Return to Photoshop Tutorials