


Open Book With Pages – Page 2 of 3
These steps go through adding a series of coloured bookmarks to the right hand side of your book. These bookmarks are then used as navigation buttons for your website.
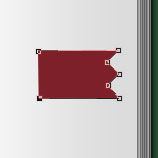
5 – Creating a bookmark
 Choose a red colour. Use the Pen Tool (with the Shape Layers option selected at the top left of the screen) to make a banner shape, as shown. Press Enter when you're finished.


6 – Finishing the bookmark
Ctrl+Click on the little image of your layer, in the Layers window. This should select its outline.
 Create a new layer.
Click Filter > Render > Clouds
 Click on the Move Tool, and nudge this layer to the left five pixels or so.
In the Layers window, change its Mode from Normal to Overlay.
 Put some text on the layer. I've used a light yellow colour here, and the Palatino Linotype font.
Right-click the text layer, choose Blending Options. Give the text a Bevel, and a Stroke. Set the Size for each of these options to 1.
For your red bookmark layer, give it a Drop Shadow, and a Gradient Overlay (Mode: Overlay, Opacity 43%), with the sliders placed as above. This gradient will help the bookmark look like it's flopping out of the side of the book, and down into the surface below.
 Create a new layer set, and drag these three layers (the text, bookmark, and clouds) into it. Put the clouds layer above the text layer, and the bookmark at the bottom.
Drag this layer set down the layers list until it's below the first page.
Drag the layer set into place if necessary.

7 – More bookmarks
Duplicate this layer set another four times, to make four more bookmarks.
Move these layers into place, and move some of them down in the layers window, so they're under more than one page. You should make the lower bookmarks stick out more.
For each of the layer sets, go in and click on the bookmark layer. Click the coloured square next to it, and change the colour. (I only used the vertical slider here. I didn't pick new colours from the colour picker.)
