


"The Slime Factory" Web Design Tutorial – Page 2 of 2
The last half of this tutorial goes into adding effects to the yellow area, adding the menu, and slicing the image.

5 – Adding some Effects to the yellow area
In the layers list, double-click your yellow layer. Set the following settings: (Leave all settings as default unless specified.)
- Outer Glow (Colour: Black.)
- Inner Glow (Colour: Black. Opacity: 54%. Size: 13px.)
- Bevel and Emboss (Style: Outer Bevel. Size: 5. Soften: 1. Gloss Contour: Ring – Double, Anti-aliased: On.)
- Contour
- Satin (Mode: Multiply. Opacity: 14%. Angle: 19°. Distance: 21px. Size: 32px. Contour: click the little box, and change it so it looks like this.)
- Stroke (Size: 3. Colour: #D8D8D8 [light grey]. Position: Inside.)

6 – A glossy coat
In the layers list, Ctrl+Click on the layer of your yellow area. This selects it.
 Create a new layer.
 Fill the area with a white, top-to-bottom "Foreground to Transparent" Gradient, like you did before.
Change this layer's Mode from Normal to Overlay.
Press Ctrl+T to Transform the area. Drag the sides and bottom in a bit, as shown on the diagram.
In the Layers list, right-click this layer, and Duplicate it.
Change the Mode of the new layer from Normal to "Lighten".
Press Ctrl+T to Transform it, and bring in the sides and bottom again.
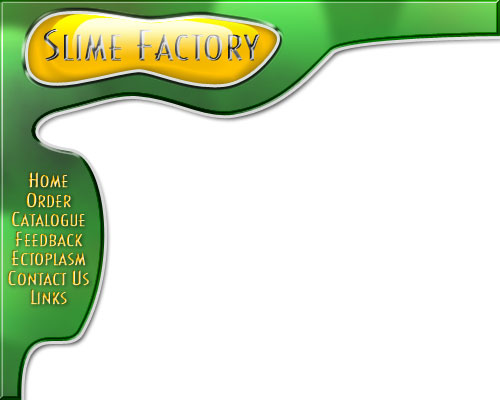
7 – Menu text and a header
 In whatever font you choose (I've used Flying Dutchman here), type in your header text in a very dark grey. In the Layers list, move it below your Lighten and Overlay layers. This makes it look like it's in with the yellowy substance.
In the layers list, double-click the text layer, and give it a Bevel (Style: Inner Bevel. Technique: Chisel Hard. Size: 29. Gloss Contour: Ring. Anti-aliased: On.)
Right-click on the layer and click "Copy Layer Style".
In an orangey-yellow colour, type in your menu text.
Right-click on the layer and click "Paste Layer Style".
8 – Getting your design into a web page editor
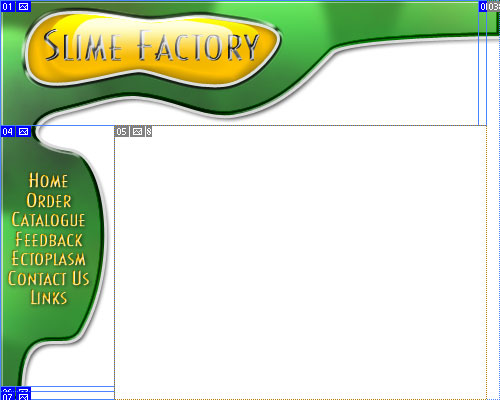
 If you're using Photoshop 6.0 or Photoshop 7.0, use the Slice Tool to draw boxes on your image. These boxes will each be saved as a separate image when you Save for Web. I'd recommend drawing one big box for your header, and one big box for your menu. There will be a big box of white space, but that doesn't matter.
Also, make sure you save two thin slices (I call them "slivers") at the right and bottom. These should be one pixel thick (I've exaggerated them here for clarity.)
Slivers are simply images that repeat indefinitely to fill up the whole width/height of the screen, regardless of the size of the screen.
Click File > Save For Web. Choose Jpeg, Quality 60.
In your web editor, Create two tables, one above the other. Set the top table to 100% width, sets its background to be the appropriate "sliver" image, and put your header image in that table.
Divide the lower table into two columns. The left column should be as wide as your menu image. Put your menu image in it, and set its background to be your sliver image. Depending on your web editor, you can use Hotspots or an Image Map to make parts of the menu into links.
The right cell should be around 500 pixels in width. If your cells aren't behaving, make sure the table's width is equal to the width of both cells added together.
That's it!
Oh, and there's no *real* Slime Factory. Well... there might be, but I don't really want to know. :)
