


Table Top – A website that looks like your desk – Page 2 of 2
This page of the tutorial deals mostly with making the pencils.
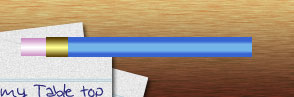
5 – Adding an eraser
For each of the eraser and metal band, repeat the same process that you used to make the pencil shaft. With these two pieces, give them a Gradient Overlay in the Blending Options. Change the Blend Mode to Overlay, and the Style to Reflected, but don't edit the gradient. These pieces should appear cylindrical, and not hexagonal like the pencil shaft.
Remember, you can use the Hue/Saturation Window to change the colour of your pencil parts at any time. Press Ctrl+U to do so.
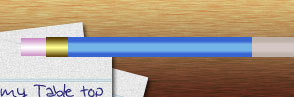
6 – Adding the pencil tip
Right-click the layer of your pencil shaft, and click Duplicate Layer. Press Ctrl+T to transform it. Make this new section much shorter, and place it at the end of the pencil shaft, as shown. Use the Hue/Saturation window (Ctrl+U) to change it to a light woody colour.
 Create a new layer, and drag it down the Layers window, so it's underneath your wooden pencil tip layer.
Click on your wooden pencil tip layer, and press Ctrl+E. This will merge it into the layer below it. The gradient is now part of the layer, not an added effect, so it will change when you reshape the pencil tip.
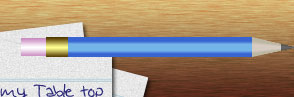
7 – Sharpening the pencil
Click Edit > Transform > Perspective.
Hold Alt and Ctrl, and drag the bottom right corner upwards. The other corner will come in to meet it, forming a point.
 Select the very tip of the pencil, and press Ctrl+U to edit its Hue/Saturation properties. Reduce the Brightness and Saturation until the pencil tip is dark grey.
Click the empty boxes next to each of the layers that make up the pencil. Then click Layer > Merge Linked, or just press Ctrl+E.
Right-click your layer in the Layers Palette, and choose Blending Options. Give it a Drop Shadow, but Change the Size and Distance to 2, so your pencil doesn't look like it's flying.
8 – Another pencil, and some menu text
Right-click and duplicate your pencil, and then use Ctrl+U to change your new pencil's colour. (Select the colour of your pencil from the menu first, so you're only changing the pencil shaft colour.)
Press Ctrl+T to rotate and position your pencils.
 Type in some menu text wherever you have room. Make your text colour black, but reduce the layer's Opacity.
Finally, click File > Save For Web, and save your image as a jpeg, at Quality 60.
