


"The Slime Factory" Web Design Tutorial – Page 1 of 2
The owners of the Slime Factory wanted a website theme that would match their company name, so they enlisted me to design it for them.
This tutorial goes through the steps I took in Photoshop to make that website. Tutorial requires Photoshop 6.0, 7.0 or above.
1 – Creating a Path
 In Photoshop, create a new image (779 pixels wide), and draw a small line with the Freeform Pen Tool. (Make sure you have the "Paths" option at the top left of the screen selected.) Ctrl+Click the line to select it. The line should have a small block at each end. Hold Ctrl and drag the blocks (points) apart, to extend the line. Add new points by clicking on the line (don't press Ctrl.) If you select a point (Ctrl+Click on it), you'll notice it has two "arms". By dragging the arms around (while holding Ctrl), you can change the curve of the line.
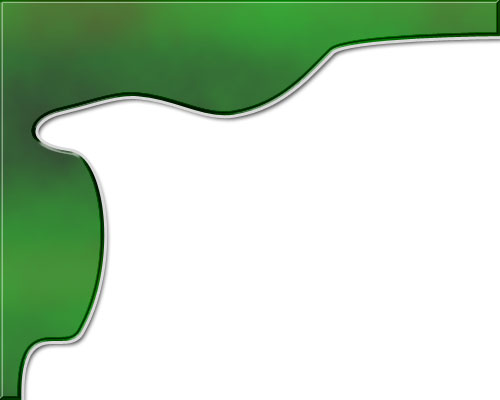
Try to make something similar to what I've made in the first diagram (Feel free to vary it as you see fit). It's okay to go off the canvas at the left and at the top (press the "Maximise" button at the top right of the window so you can see outside the canvas.) However, it is very important that the two ends of the line are very close together, as they'll connect up in the next step to form an enclosed area.
Where your shape meets the edge of the canvas at the right, and at the bottom, make sure it's fairly straight, as you'll need to make a "sliver" later on, to make this shape continue across your page to the full page width.
Remember - always hold Ctrl when moving a point or an arm.
2 – Adding Clouds and other Effects
With the Freeform Pen Tool still selected, right-click the line, and choose "Make Selection".
 Create a new layer.
Choose a light green as your foreground colour, and a dark green as your background colour. Click Filter > Render > Clouds, and your area will fill with splotchy green.
In the Layers list, double-click on this layer, and the Blending Options screen will appear. Set the following options: (Leave all settings as default unless specified.)
- Drop Shadow
- Bevel and Emboss (Style: Inner Bevel. Technique: Chisel Hard. Size: 2. Angle 135°, 34° (adjust this if you like.) Global Light: Off. Gloss Contour: Ring – Double, Anti-aliased: Off.)
- Gradient Overlay (Blend Mode: Color Burn. Opacity 29%. Gradient Black - White - Black - White. [Click on the little gradient bar and put in extra tabs to do this.])
- Stroke (Size: 3. Colour: #D8D8D8 [light grey].)

3 – Spotlights
Create a new layer.
 On the Toolbox, hold down on the Selection Tool icon, until a few other Selection Tools appear. Choose the Elliptical Selection Tool. (Shift+M will also work, if you're using Photoshop 7.0). with this tool, draw an upright elliptical selection.
 Change your foreground colour to white, and select the Gradient Tool. Click on the visual representation of the gradient at the top left of your screen. (If you're not using Photoshop 6.0 or Photoshop 7.0, you'll need to click on the Options Palette, and click Edit.) Choose "Foreground to Transparent".
Apply the gradient inside your selected area, from top to bottom. Press Ctrl+D to deselect. Click Filter > Gaussian Blur, and set it to about 5.0.
Change the layer's Mode from Normal to "Overlay".
 With the Move Tool, move the layer over the top of your green area. It should now look something like the spotlight at the centre-top of Diagram 3, above. With the Move Tool still selected, hold Alt, and move the spotlight somewhere else. This should copy it. After you've made a few copies, press Ctrl+T for each one, to rotate it a bit.

4 – Creating something vaguely resembling an egg yolk
With the Freeform Pen, select an area as shown. After the pain of Step 1, creating a shape like this should be no problem. :) Right-click the line, and click "Make Selection".
Create a new layer.
 Choose an orangey-yellow colour, and fill the area, using the Paint Bucket Tool.
