


Creating a Web Page Header in Photoshop – Page 1 of 3
The most important graphical element of any website is its header image. It's the image that will be seen more than any other on your web site, so it's important to get it looking good.
This tutorial gives an example of how to use Adobe Photoshop to make a graphical header image for your web page, that has some button functionality too.
1 – Creating some curves with the Freeform Pen Tool
Open Adobe Photoshop and make a new image. Set the image's width to the width you'd like your header to be on your web page.
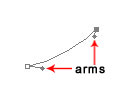
 Hold down on the Pen tool, and select Freeform Pen. Draw a small line. (Make sure you have the "Paths" option at the top left of the screen selected.) You can hold down Ctrl and drag the points around, or you can manipulate a single point by dragging its "arms". Remember to always hold down Ctrl while you do it.
Use curves liberally in your web pages. A number of factors, including the easy use of tables, has made modern web design very straight-edged. By using curves in your pages, you can give your page a much more organic feel.
2 – Manipulating the Path
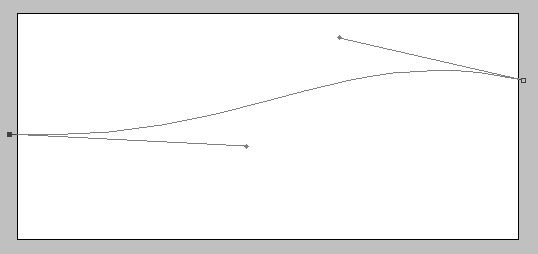
Hold down Ctrl and drag one point to each side of your image. Drag the arms away from the points to make the curves more gradual. To see outside the canvas, you may need to maximise the window you're working in, or zoom out (Ctrl -).

3 – Extending the Path
It's important that you form a whole shape with the Freeform Pen tool. Simply creating a line isn't enough.
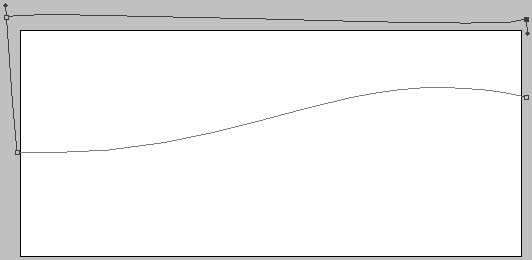
Without pressing Ctrl, click on the line just next to the leftmost point. This will create a new point. You can then drag the leftmost point up above the top of the image as shown.
4 – Creating a full circuit
Repeat the process, by clicking just below your highest point, to make a new point and then moving your highest point way over to the right.

5 – Creating a selection and filling it with the Paint Bucket
Right click your line (you must right-click a part of the line that's inside your image.) Click Make Selection. This connects the last point on your line to the first point. (In Adobe Photoshop 5.0, you may have to right-click again and click Turn off Path, to make the line go away. In Adobe Photoshop 6.0 and Adobe Photoshop 7.0, it's automatic.)
Make a new layer, select a colour, click on the Paint Bucket tool, and fill the selected area.

6 – Creating a shadow and bevel
Right click on your layer, and select effects (Adobe Photoshop 5.0) or Blending Options (Adobe Photoshop 6.0 and Adobe Photoshop 7.0). Give the layer a Shadow and an Inner Bevel.
